
|
|

|
|
|
|
|
 09-02-2010, 12:14 PM
|
#1 | ||
|
injection is nice, but...

Join Date: Jul 2007
Location: Camden, N.S.W
Posts: 1,070

|
In the prevous posts i said i had to helicoil a thread in the bellhousing to recover the stripped thread.
Thats all well and good, but it occured to me that some people starting out in the car game or that have an office job that isnt exposed to this hands on work, may have only heard about the process and not really understood the actual way its done. The AFF is a wonderfull thing in that it brings people from all walks of life together! So i thought i might do an artical on helicoiling for beginners! As a bit of background of my carrer, i have now being a fitter machinist for near on 20 years, and have specialized as a maintenace fitter for all but 4 of those and that was my apprenticeship as a Fitter machinist anyway. Lately,my day to day activities include breakdown repairs, preventitive maintenance and continual improvement of 5 fast paced production lines in a well known fast moving consumer goods factory. Previous work i've done included a 2 year stint as a car fabricator / builder, building show cars for customers, untill both the poor bussiness skills of the owner of the shop and the GFC caught up and i quit what was my dream job. Also worked for one of Australia's largest insulation companies for 7 years as the Maintenance supervisor, organising up to 16 tradesmen with jobs and planning, ect. previous to that. Completed my apprenticship and stayed on as a maintenace fitter with a government dept. for 10 year prior to that. On with the show. Before I start, this isnt the only way to recover threads that are damaged, this is only one way of various ways to do the job. I must also mention that "helicoil" is a brand name, but has become so well known that in industry, its name has stuck to to the process im about to show. Other methods of thread recovery vary, either because the thread in question is male or female, tapered thread or a non standard type thread, eg square (check the screw on your vice ) or buttress type( similar to a saw tooth profile). Other methods may include one or more of the following; # Replacing the bolt or nut! ( first choice if possible) For castings or weldments (fabricated parts) # Chasing the thread with a tap ( repairs damaged, but intact female threads) # Drilling, plugging and re tapping. # Drilling and tapping to the next size up. For studs in the above. # Chasing the thread with a die nut ( damaged male thread). # using a thread file to clean out debris and damaged threads ( male and female). I could go on (and have been!). The helicoil, as mentioned is a brand name, i'm using the brand "recoil" as its a lot cheaper, and made in Australia (verses USA),comes as a kit and is as good as other brands. As a guide the kit im using today cost around $90.00 plus GST at trade discount rates, figure $120 over the counter. For that you get - drill of the correct size, - High speed steel tap, not a cheap carbon steel one. - the installation tool - a tang removal tool - and 3 lengths of inserts totaling 18 all up. You can buy just the inserts once youve used them up, retaining the kit. 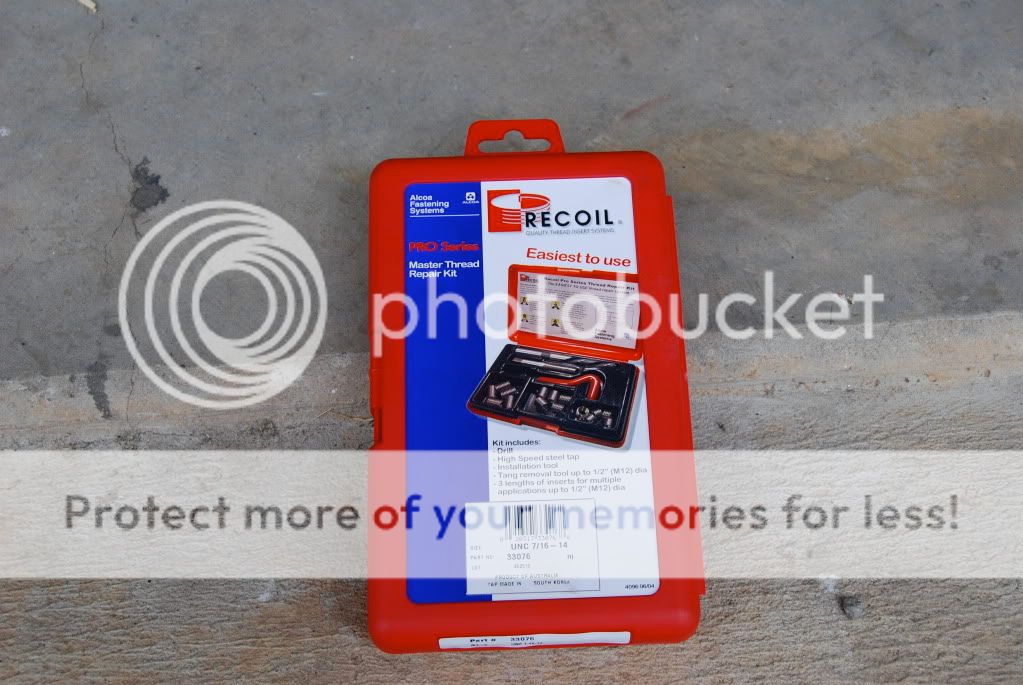 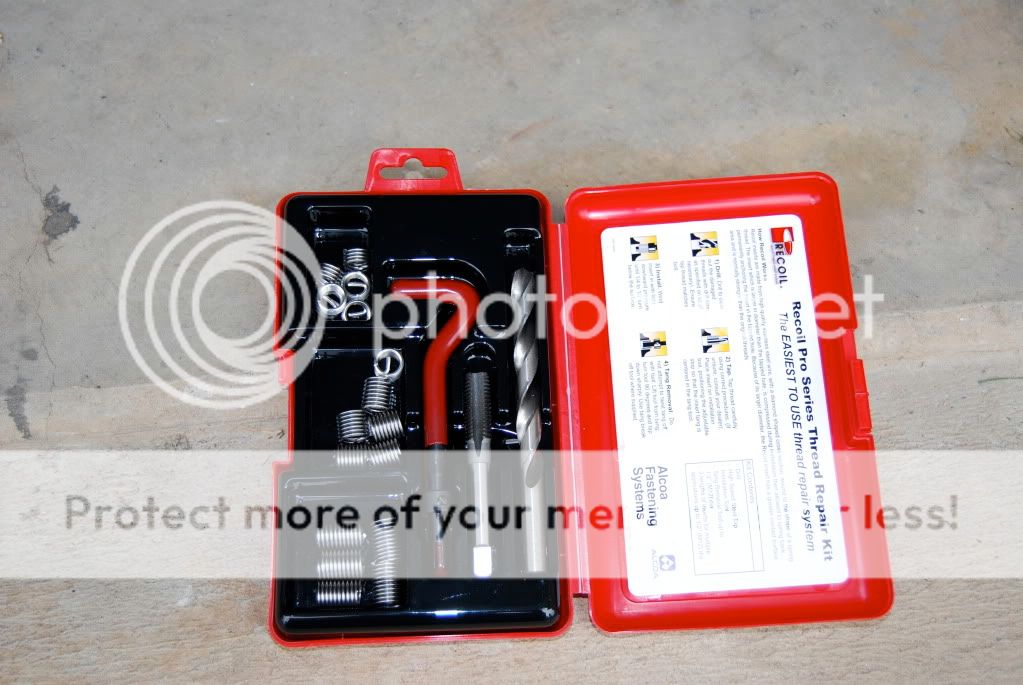 On the cover of the box you can see the thread size, for this application, UNC 7/16"-14. Quick explanation, UNC is the thread form, "Unified National Course" 7/16" is the outside dimension of the male thread in fractions of inches. -14 is the TPI, or Threads Per Inch, the number for complete threads over a measured inch of the bolt. this will change for a fine threads ( greater number) and metric as well as different diameters of bolts. Also as a tip for beginners, the bolt size the the thread diameter, NOT the spanner size you use to tighten it! i have heard this asked at an engineering supply shop. The threads that attach the gearbox to the bellhousing , the one's that hold the bellhousing to the engine block, engine mount bolts and the one's that hold the accessories to the heads are all 7/16 unc on a clevo. How a "helicoil" works. The inserts are made from a high qualitiy stainless steel wire, with a diamond shaped cross section, wound to the shape of a spring thread. The insert which is larger in diameter than the tapped hole, is compressed during installation then allowed to spring back, permanently achoring the insert in the tapped hole. Beacuase of its lager diameter, the insert has a greater contact surface area and is normally stronger than the original threads. [B]How to do it[/B] 1. Drill. Drill the hole with the suppied drill. This is sized correctly for the insert. sometimes it isnt required if the thread has been totally ripped out, but this would be classed as an advanced method only, first timers, use the drill. Ensure the new hole is in the same plain as the original, use a drill press if you can for better results. im using a hand drill for this as a few threads were missing from the top of the bolt hole giving me a start. 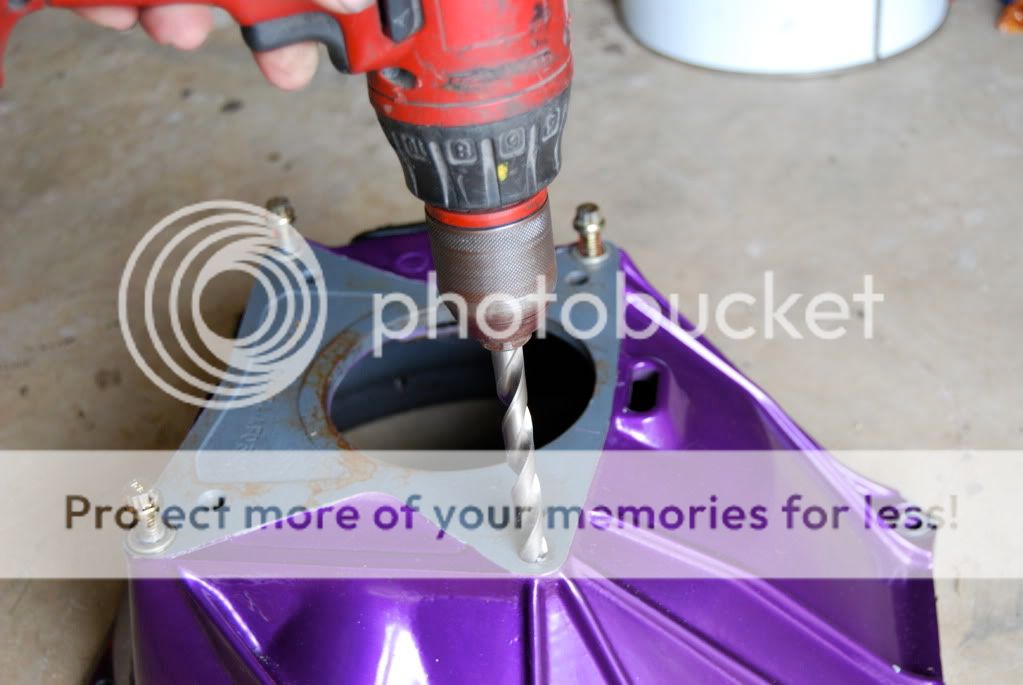 2. Tap. Tap the thread carefuly, using downward pressure and go slow, some tapping compound may help, but as im going into cast iron, none is really needed. Once you have the tap started, for every one complete turn of the handle, back it out about a 1/3 of a turn, this removes the chips of metal from the new threads as they are formed and will help stop the tap getting jammed. Dont be afraid to take the tap all the way out and clean it if your having a hard time. Proberly another whole artical on tapping threads could be written. Dont force the tap!, if you think your in trouble now, wait till you break a jammed tap in a hole. Use two hands in the tap wrench ( im taking the photo with the other!). Tap as deep as you can, or all the way through on an open hole. It must be said that the taps a specially made for this application and they wont work as a regular tap, that is, no bolts are available to go straight into the tapped hole. why?, glad you asked. Because the TPI will be incorrect for the diameter of the tap, which, is an odd size anyway to account for the thickness for the insert.. 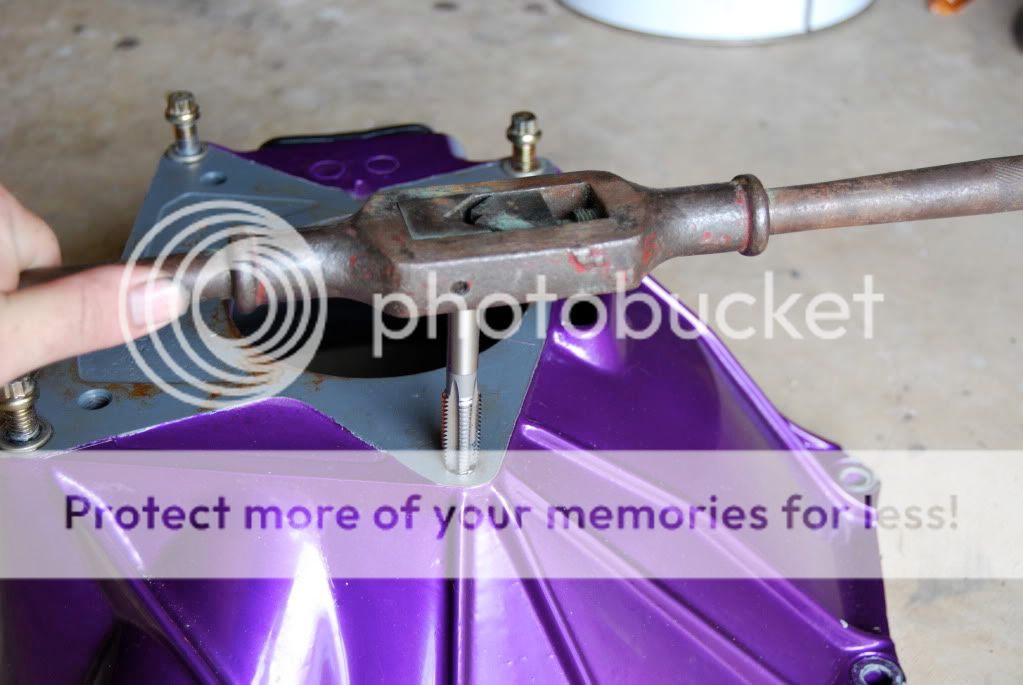 3. Install the insert. Place the insert on the end of the tool provided and adjust backstop. Wind into the newly tapped hole with light downward pressure untill it is 1/4 to 1/2 a thread below the surface, check the hole depth before starting in the case of a blind hole. It must be said, you only get one go at this as it wont wind out. you would need to grab it with pliars and pull it out, if it still didnt go in deep enough, destroying the insert.  This is an insert. 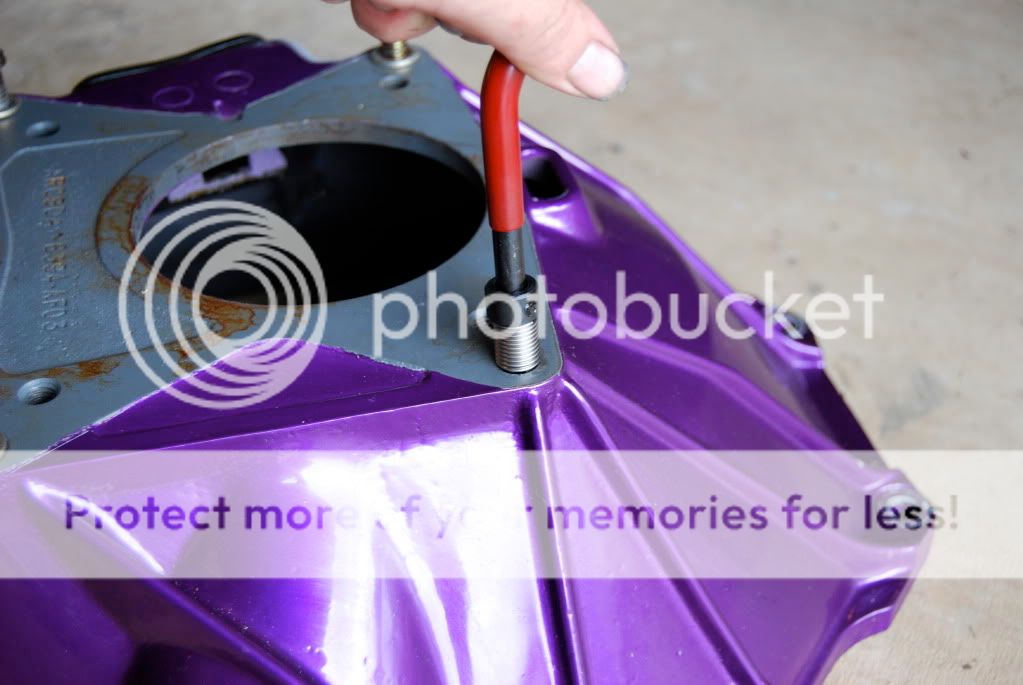 Tang removal. Withdraw the insert tool a 1/4" and turn 90*. make a sharp tap on the tool with a small hammer. this will shear off the driving tang. hard to photograph. no photo. Before shot 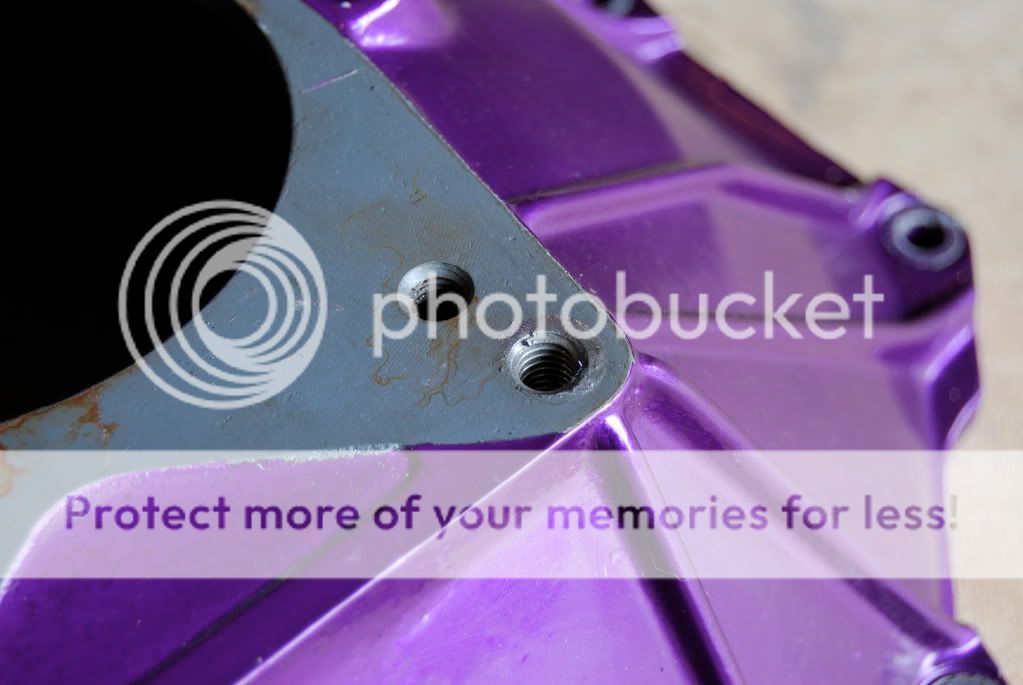 After shot. with antisieze around it, after checking for fit. 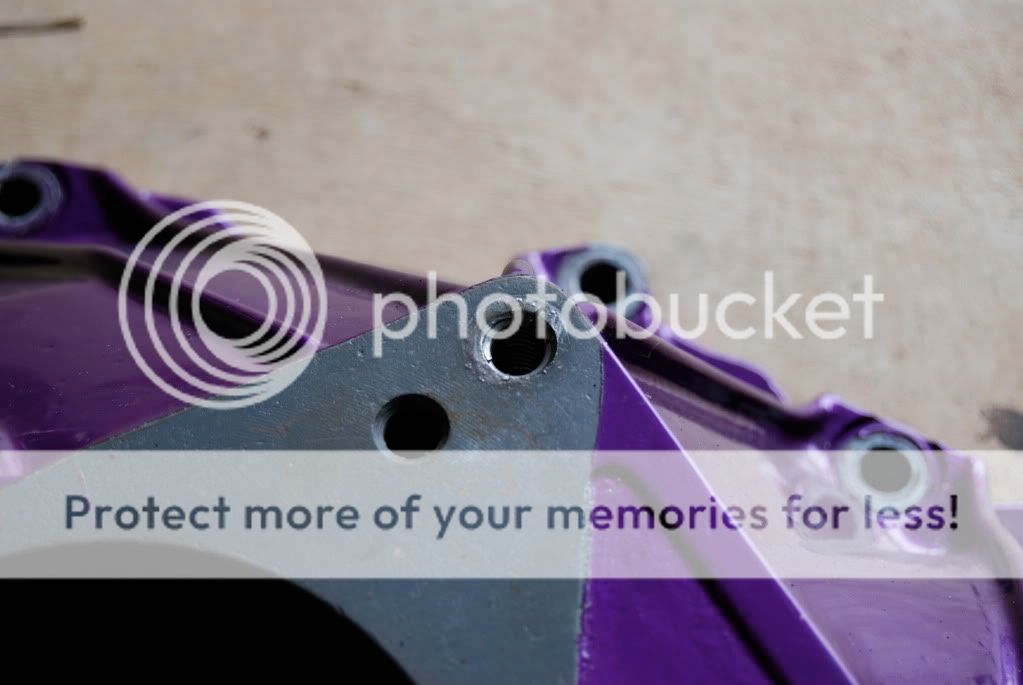 So all finished, strong and reliable. hope you may have learnt something, or just killed a bit of time reading this dribble, for that im sorry!  : : : :
|
||

|

|
|
09-02-2010, 08:42 PM
|
#2 | ||
|
the money box

Join Date: Apr 2008
Location: blacktown
Posts: 417
|
the mans a genius
 : :
|
||
|
|
|
|
09-02-2010, 09:25 PM
|
#3 | ||
|
'69 XW

Join Date: Dec 2007
Location: Bris Vegas
Posts: 726
|
Awesome write up! As always, great detail and photos. I'm not a huge fan of wrapped headers either but the black tape looks much better than the white, nice stealth look. Not good on the wallet though...
|
||
|
|
|
|
09-02-2010, 10:12 PM
|
#4 | ||
|
Awesome

Join Date: Oct 2007
Location: In my own little world..Everyone here knows me :)
Posts: 9,401

|
Gary....you are amazing!! The time and effort you spend..
I felt priviledged to see the beast in the flesh in Echuca mate...Truely is a work of ART!
__________________
|
||
|
|
|
|
14-02-2010, 01:47 PM
|
#5 | ||
|
injection is nice, but...
Join Date: Jul 2007
Location: Camden, N.S.W
Posts: 1,070
|
now thats a cold beer if i ever seen one. and yep, its your shout.
how the coupe going Trev. |
||
|
|
|
|
14-02-2010, 01:55 PM
|
#6 | ||
|
injection is nice, but...
Join Date: Jul 2007
Location: Camden, N.S.W
Posts: 1,070
|
Rain has again slowed progress. Wanted to sling the motor in, but isnt much fun with both roller doors up and the rain comming in. Oh well.
|
||
|
|
|
|
14-02-2010, 02:34 PM
|
#7 | ||
|
Regular Member

Join Date: May 2007
Posts: 489
|
Looks like time for a carport outside those roller doors, eh mate?
|
||
|
|
|
|
16-03-2010, 07:58 PM
|
#8 | |||
|
injection is nice, but...
Join Date: Jul 2007
Location: Camden, N.S.W
Posts: 1,070
|
Quote:
__________________
Proud member of the Clevo Mafia Limetime Green '74 XB Coupe- Classic not Plastic. Blueprint '02 Pursuit 250- Plastic not Classic (yet) Venom '01 AUII Rebel- RIP. Gone to a better place. Winter White '12 FG GT 335 R-Spec - something the wife thrashes daily '05 CRF450X- For getting dirty in the, um, dirt. 
|
|||
|
|
|
|
15-02-2010, 05:47 AM
|
#9 | ||
|
Regular Member

Join Date: Dec 2008
Location: Upper Shaggers Ridge Heights
Posts: 119
|
The shells still out at Cowra, one more panel to fix before prep.
Still wont be ready for next Echuca.  : : Rather fix this problem before I get it back, http://www.fordforums.com.au/showthread.php?t=11284709 |
||
|
|
|
|
14-03-2010, 09:10 PM
|
#10 | ||
|
injection is nice, but...
Join Date: Jul 2007
Location: Camden, N.S.W
Posts: 1,070
|
hey guys!,
Got the motor back in a few weekends ago, no probs at all. Put the extractors on and used a bit of sealant this time, it will be a pain in the butt to scrape the gasket off next time but at least it doesnt leak. Bolted up the 'zorst and installed two new "mufflers" for rego. basically i made a 12" length of 2" perforated pipe. one end has a flange to suit the existing pipes and the other a smaller flange about 2" inside and just under 3" on the outside. i then wrapped some muffler packing ( from my friendly Honda dirt bike dealer) around it and slid it in between the collector and tail pipes. All up cost $30.00. result a drop in exhaust db from 102 on idle to 94 db. tops!. And its possible to be removed at a later date. Oh, also put a balance pipe in, was going to do a X-pipe but endd up just going the good old "H" version. Replaced a badly made brake line adaptor, Re bled the brakes, moved the passenger side watts link arm up 47 mm. Also got a decal made for the brake fail light in the dash ( yet to be done). ive also finished off the body work on the hood scoop and stone guarded the inside of that. This is, of course, to satisfy the engineer for rego. Whats left?, glad you asked!. Put the electrics in for the brake fail light, some new front tyres ( one has a bubble in the side wall, prob from sitting so long), and finish off the reat seats and center console. Got a few weeks off from work so i'll do my best to finish it off, tho it is supposed to be family time this holidays. Now i know you people are photo happy, so here are some shots of a fellow AFF members JGS. it too has been in the build for a decade or so. 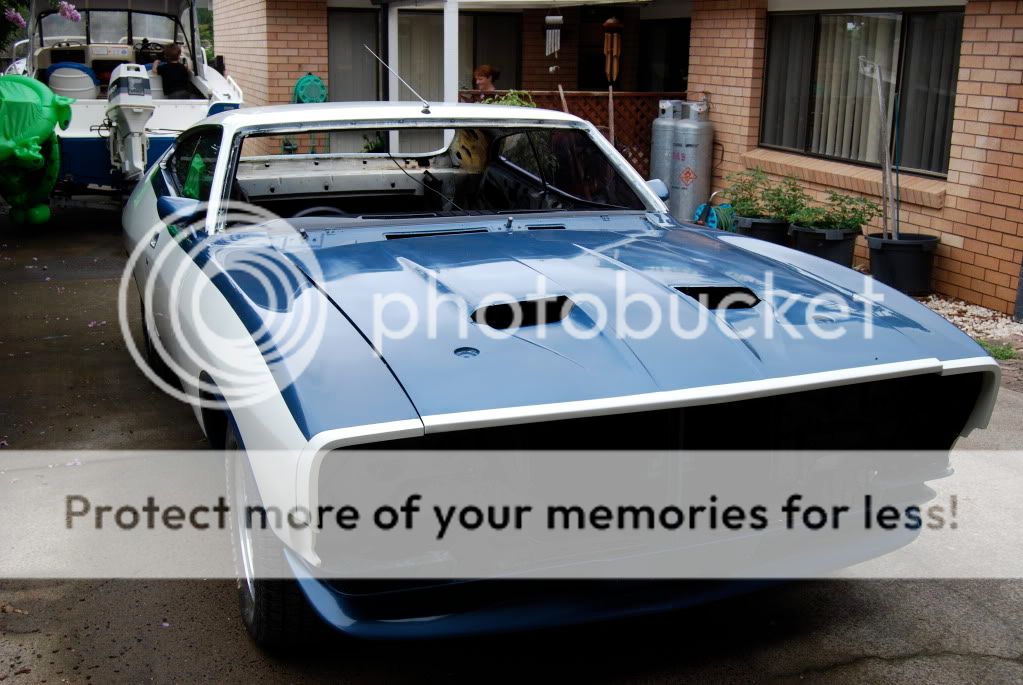 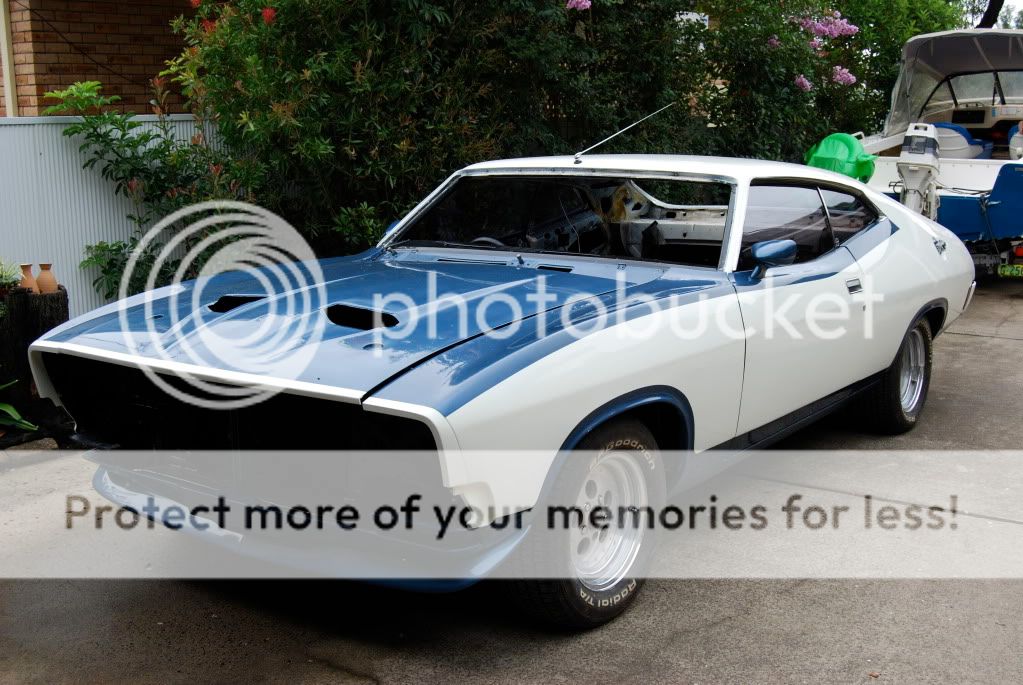 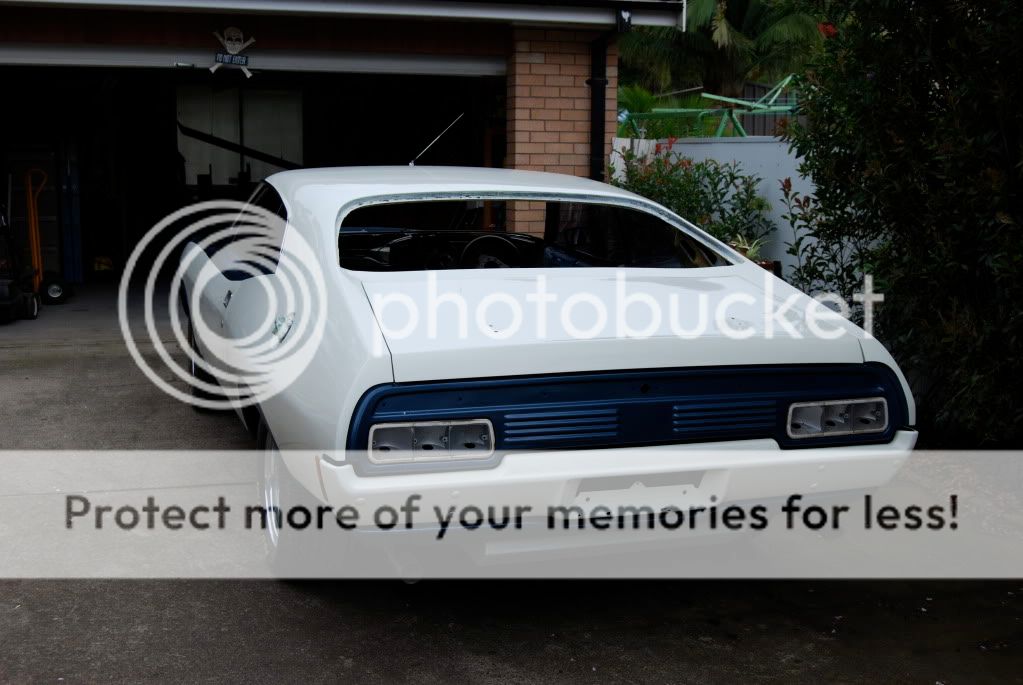 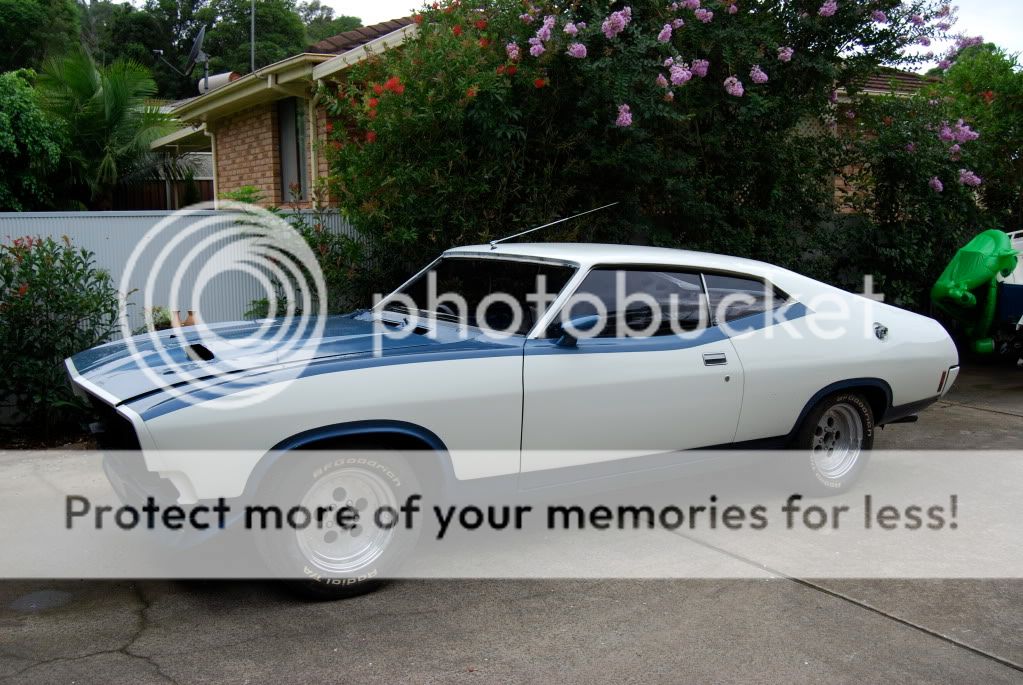 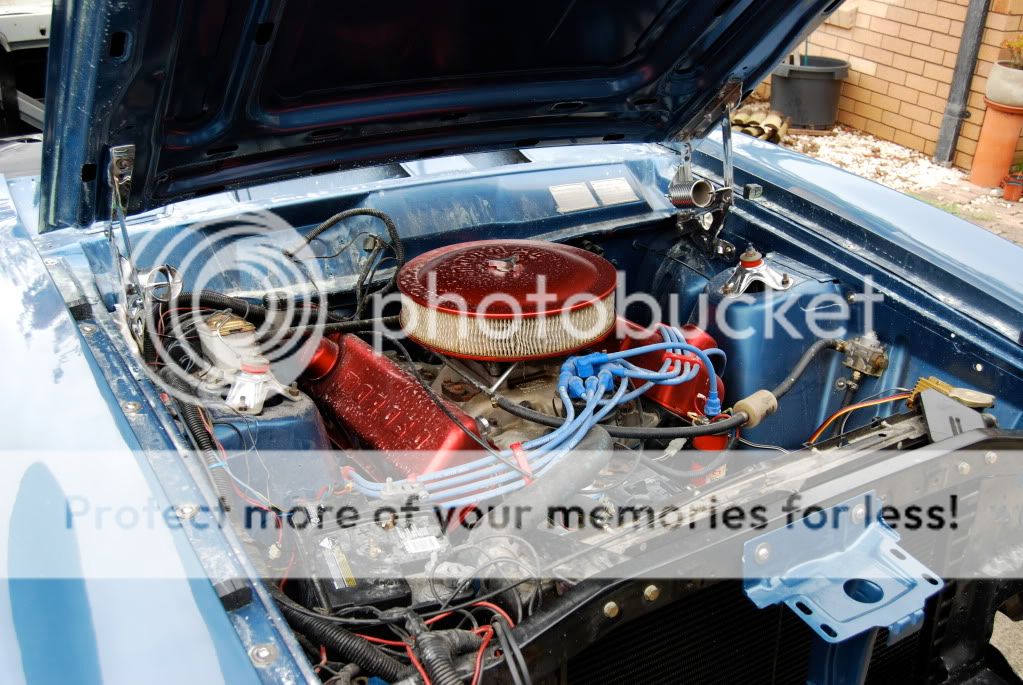 Nabs has done an excellent job so far (all his own work) in rebuilding this car. He has owned it for quite a while, at least 18 years i think, and has been fixing her up after been rear ended by another motorist. Some new wheels turned up a coup;e of weeks ago, so its full steam ahead... f
__________________
Proud member of the Clevo Mafia Limetime Green '74 XB Coupe- Classic not Plastic. Blueprint '02 Pursuit 250- Plastic not Classic (yet) Venom '01 AUII Rebel- RIP. Gone to a better place. Winter White '12 FG GT 335 R-Spec - something the wife thrashes daily '05 CRF450X- For getting dirty in the, um, dirt.
|
||
|
|
|
|
16-06-2010, 07:37 PM
|
#11 | ||
|
injection is nice, but...
Join Date: Jul 2007
Location: Camden, N.S.W
Posts: 1,070
|
Quick update.
Most rego issues have been sorted now, but still need to do the brake and noise test. Im happy to say that the trimmers have been booked to retrim the back section for the car, due to the installation of the bucket seats. there is a far amount to do as well, this is because the harness's have been replaced by eneria reel belts and rear belts added ( also child safety mount for the boys baby seat). the front enertia reels protrude into the flat floor, so that needs to be rebuilt and the rear seats are pushed all the way back to the parcel tray, requiring the parcel tray trim to be modified. All ready repositiond the Amp and its wires and also have moved the brake boosters too. Heres a quick shot of the mock up. 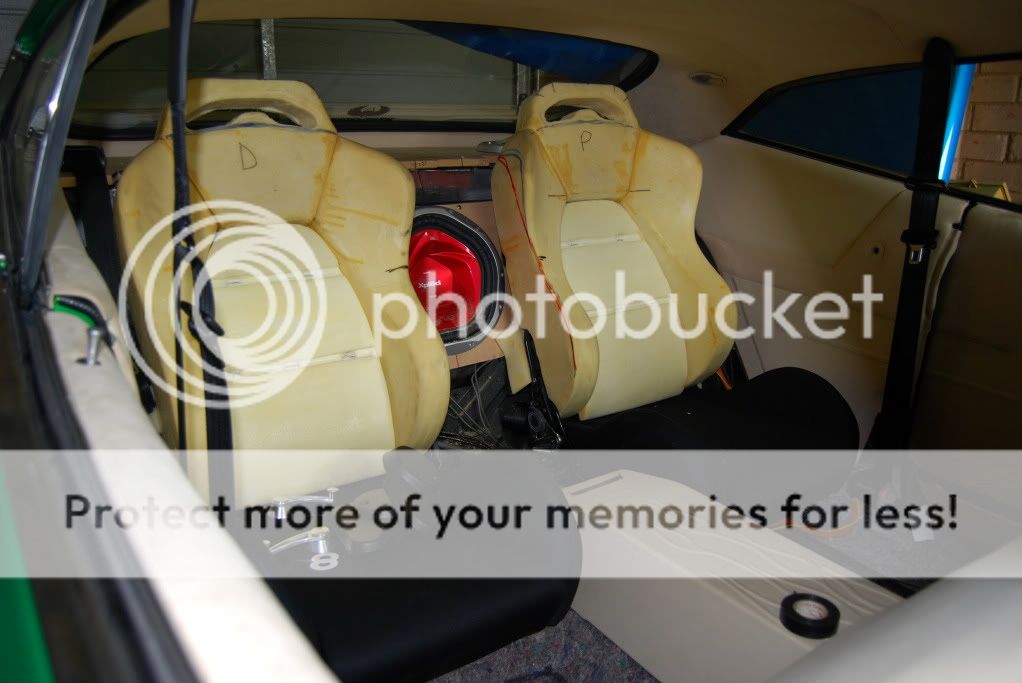 The tops of the seats have been cut off at the blue texta line to improve rear vision for the driver. As you can see the sub has been relocated too, though sound isnt too important to me. speakers have gone to the parcel tray too. The foam on the base of the seats will be trimmed to lower the seating position to give better head room and the shape of the insert on the back will be molded to suit the front seats. Still need to make covers for the enertia reels for the rear seats and the fill panels for seat to door trim and the center console extention as well. The car is booked to have the trim work done the week of AFD sydney, so its going to be a busy week!  The boys are still flat out after summernats, (the HQ that won Tuff street was and elite customs trim job and has got them a fair bit of work) and this is the only time mine could be squeezed in. Back on the engine build up side of things, Ive just finish a 429 for my brothers XW ute, so i'll be getting back into mine shortly. ive made up some new stuff so here you go. 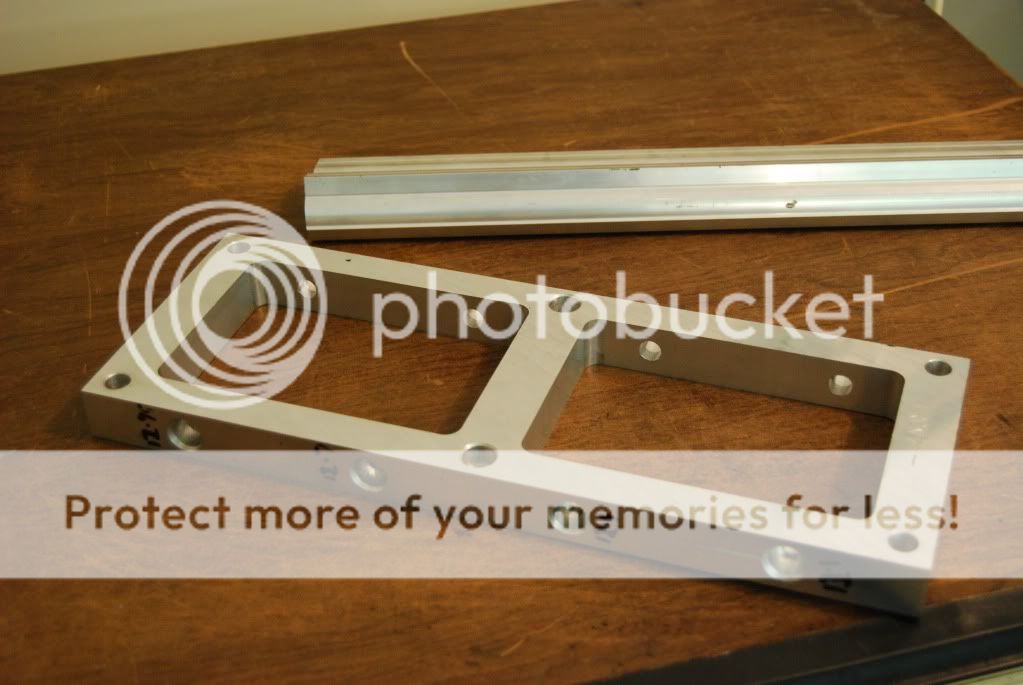 This is a sandwich plate for between the blower and injector hat, to hold electronic injectors. machined the fuel rails too. made from 6061 Ally, there is about 5 hours machine work for both the plate and rails, yet to make the supports to tie the two together. 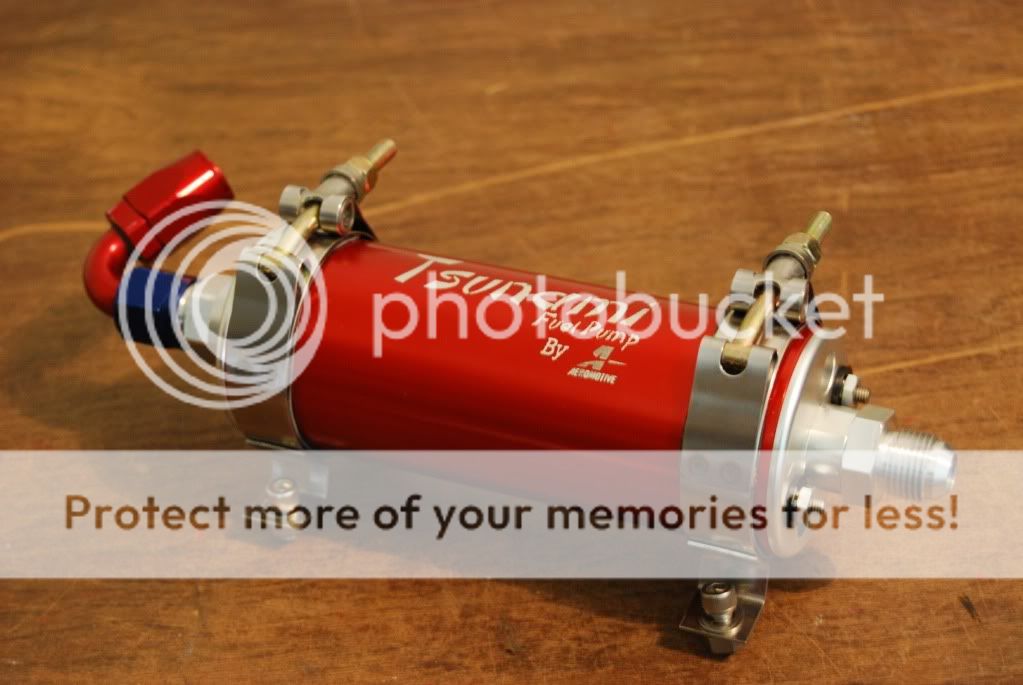 This is the high pressure fuel pump, fed from the swirl pot. 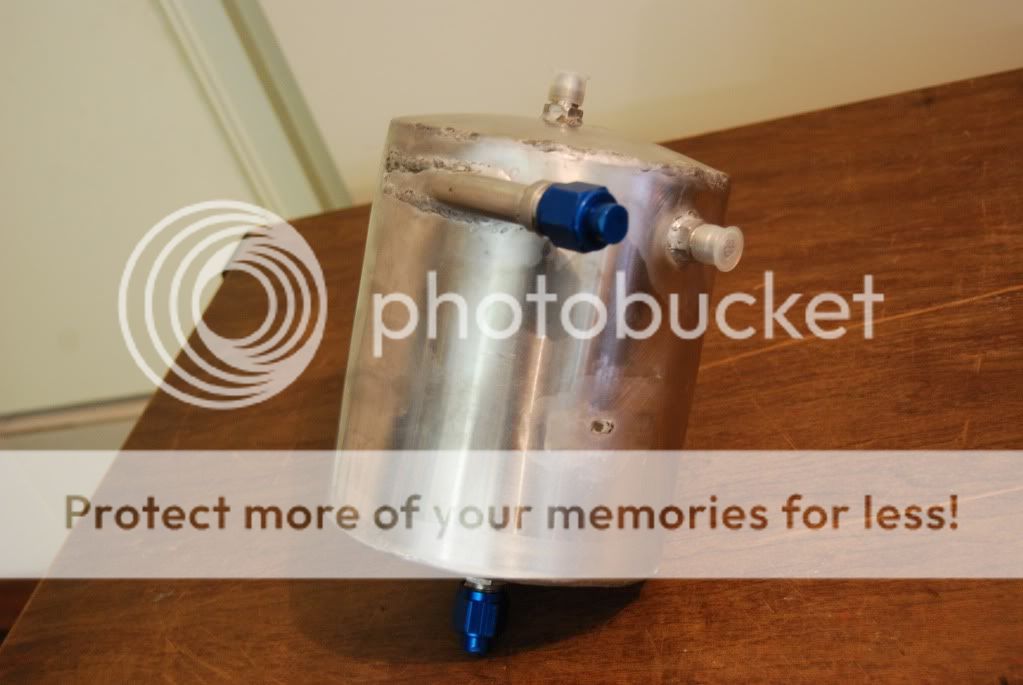 This is the swirl pot. Made from 316 stainless steel, it fetures and intrenal baffle, -8an in and out feed bungs and a -6 return to tank as well as a -6 return from the fuel rails. It holds 3.6 Lts and is to be fed buy the two existing holley blue pumps. Its not pretty but it works!  Made these bungs to go into the fuel pump, -8 in and out feed lines  and the ECU. Ive also started on a new sump out of Alloy and made a sync pickup for the cam (No. one TDC sync) Looking at a few options at present. forged Piston choice for a blown stock stroke, stock length rod, 20 thou over clevo is a bit small, so either the block will go to 0.030" or i'll put a Scat 393-408 stroker kit in it giving me a better piston chioce with out going custom pistons ( another chioce). from there its timing chain, push rods, main studs, girdle and away we go again. Seeya on the streets!
__________________
Proud member of the Clevo Mafia Limetime Green '74 XB Coupe- Classic not Plastic. Blueprint '02 Pursuit 250- Plastic not Classic (yet) Venom '01 AUII Rebel- RIP. Gone to a better place. Winter White '12 FG GT 335 R-Spec - something the wife thrashes daily '05 CRF450X- For getting dirty in the, um, dirt.
|
||
|
|
|
|
16-06-2010, 08:07 PM
|
#12 | ||
|
2nd base mobile
Join Date: Jan 2005
Posts: 675
|
just a thought, i would have thought a 0.20" oversize bore would give you alot more strength and possibily run alot cooler.
cheers dell
__________________
67 xr falcon panel van 56 oldsmobile super 88 hardtop 36 ford pickup |
||
|
|
|
|
17-06-2010, 10:40 AM
|
#13 | ||
|
injection is nice, but...
Join Date: Jul 2007
Location: Camden, N.S.W
Posts: 1,070
|
yeah thats why i got the block bored to .020 (hasnt been honed to size yet, waiting to size to each piston). trying to keep the most amount of meat in the bores as possible.
But it does limit piston chioce off the shelf. Still looking though. The alloy heads have a chamber size of 75 cc and im aiming for about 8.5 to 9 CR. but would prefer a zero deck height to squash the mix into the chambers. Failing that. the deck hieght could go to 0.020, allowing a 10 thou clean up.
__________________
Proud member of the Clevo Mafia Limetime Green '74 XB Coupe- Classic not Plastic. Blueprint '02 Pursuit 250- Plastic not Classic (yet) Venom '01 AUII Rebel- RIP. Gone to a better place. Winter White '12 FG GT 335 R-Spec - something the wife thrashes daily '05 CRF450X- For getting dirty in the, um, dirt.
|
||
|
|
|
|
17-06-2010, 06:26 PM
|
#14 | ||
|
the money box
Join Date: Apr 2008
Location: blacktown
Posts: 417
|
mmmmmmmmm blown & injected alloy headed goodness..........when can we go for a drive?

|
||
|
|
|
|
20-07-2010, 07:00 PM
|
#15 | ||
|
injection is nice, but...
Join Date: Jul 2007
Location: Camden, N.S.W
Posts: 1,070
|
Well good news,
the trimmers were over today and started on the retrim of the back half of the coupe. all is looking well, photos to follow tomorrow. basically, all fabrication and thinking power will be done by this time tomorrow, they will take the parts back to their shop (the boys are working on the coupe at my home, cause i've got other stuff i need to do as well) and trim then up then a refit on friday/saturday. Sweet, can't wait. Also managed to track down a siutable car trailer for the right price. depending on total cost of the retrim, i'll pick that up on saturday..
__________________
Proud member of the Clevo Mafia Limetime Green '74 XB Coupe- Classic not Plastic. Blueprint '02 Pursuit 250- Plastic not Classic (yet) Venom '01 AUII Rebel- RIP. Gone to a better place. Winter White '12 FG GT 335 R-Spec - something the wife thrashes daily '05 CRF450X- For getting dirty in the, um, dirt.
|
||
|
|
|
|
20-07-2010, 11:53 PM
|
#16 | ||
|
Awesome
Join Date: Oct 2007
Location: In my own little world..Everyone here knows me :)
Posts: 9,401
|
Congrats on the trailor. Be good to see what she looks like with the rear seat done. Well done mate

__________________
|
||
|
|
|
|
20-07-2010, 11:58 PM
|
#17 | ||
|
FF.Com.Au Hardcore

Join Date: May 2005
Location: Canberra
Posts: 954
|
Hells Yeah, cant wait to see some pics!
__________________
Old car 1973 Vivid Blue Pearl XB Coupe Engine Build up and progress thread New Car 2008 FG F6 Ute |
||
|
|
|
|
21-07-2010, 12:50 AM
|
#18 | ||
|
FF.Com.Au Hardcore
Join Date: Mar 2005
Location: whitsundays
Posts: 1,340
|
lucky boy to get to ride in the back of that coupe. interior is too cool, love buckets in the back of cars, probly cause i once owned a landie and the rear seats and little console thingo's were my favorite bit
|
||
|
|
|
|
21-07-2010, 09:19 AM
|
#19 | ||
|
injection is nice, but...
Join Date: Jul 2007
Location: Camden, N.S.W
Posts: 1,070
|
thanks peoples.
hopefully we make good progress today, otherwise the AFD timeframe may be out the window (does this sound familiar, col.) Oh well back to it.
__________________
Proud member of the Clevo Mafia Limetime Green '74 XB Coupe- Classic not Plastic. Blueprint '02 Pursuit 250- Plastic not Classic (yet) Venom '01 AUII Rebel- RIP. Gone to a better place. Winter White '12 FG GT 335 R-Spec - something the wife thrashes daily '05 CRF450X- For getting dirty in the, um, dirt.
|
||
|
|
|
|
21-07-2010, 09:12 PM
|
#20 | ||
|
injection is nice, but...
Join Date: Jul 2007
Location: Camden, N.S.W
Posts: 1,070
|
a few photos from today.
The complete fabrication was finished today and i am quite pleased as to how it came out, although it is hard to imagine what it wil look like trimmed. Forgot to take some photos all together, as we were on a time crunch to finish it all off today. Had some issues but. Really wanted a monitor in the back for Lachlan, but it just wouldnt fit without looking out of place. Also, the center console needed to be cut a bit as well to fit, adding to retrim costs. The major issue is that the suede has not arrived in Sydney and no one is sure where it is... damd couriers. will we make All Ford Day on Sunday?, depends if materials turn up tommorrow.. Photos  new alloy flames under the interior light 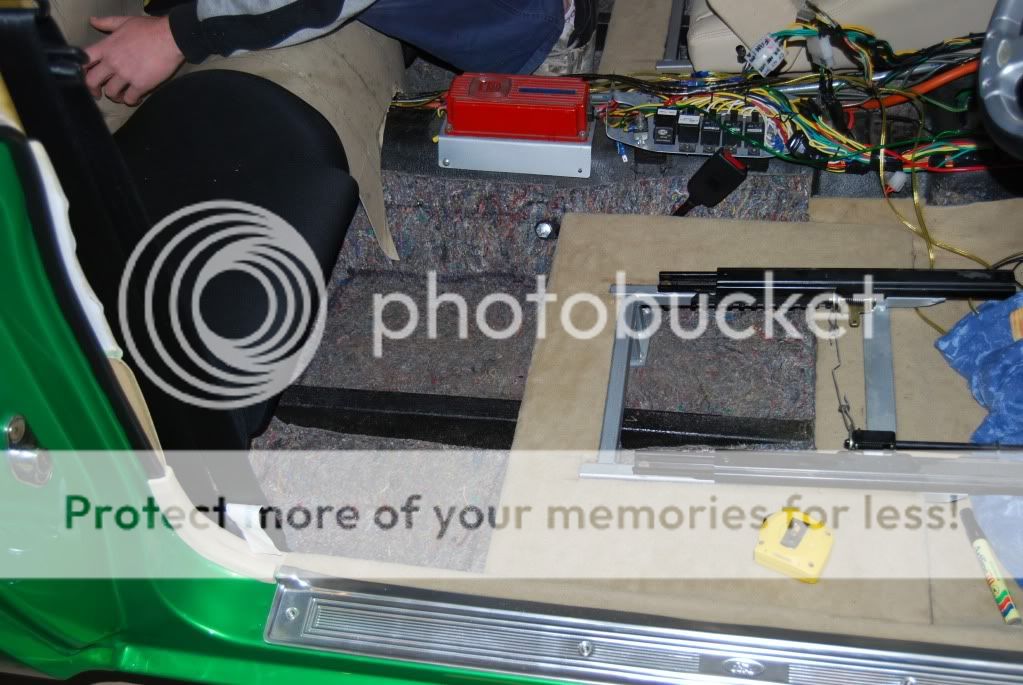 Original flat floors cut back to give foot space for rear passengers (note RHS chassis conector, originally covered by floor. "PITA") 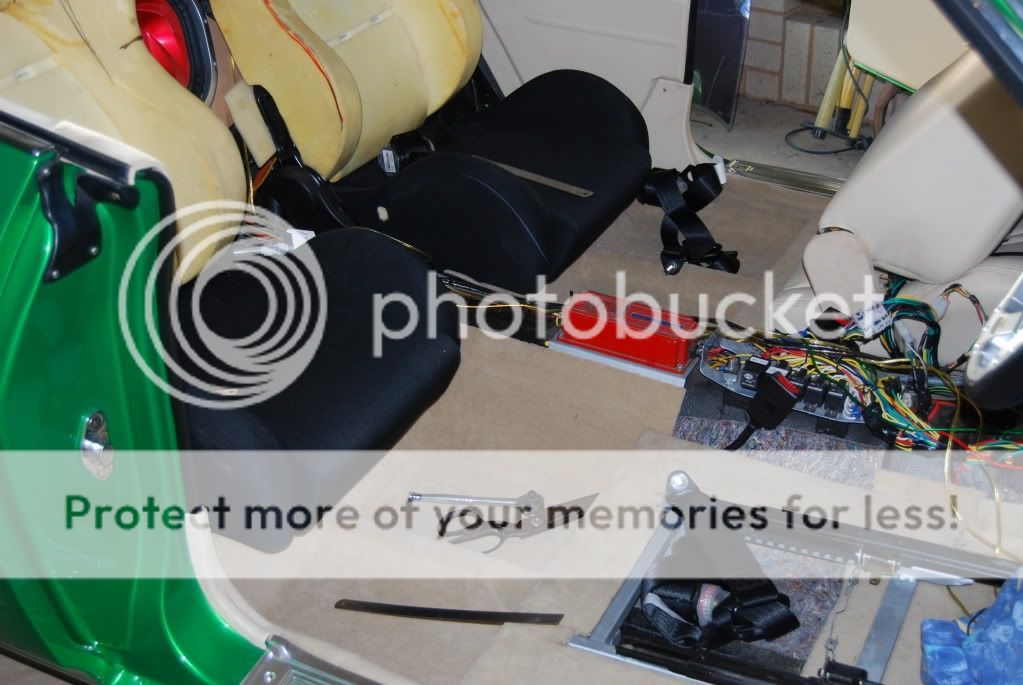 This is what $400 worth of Mercedes Benz carpet looks like. 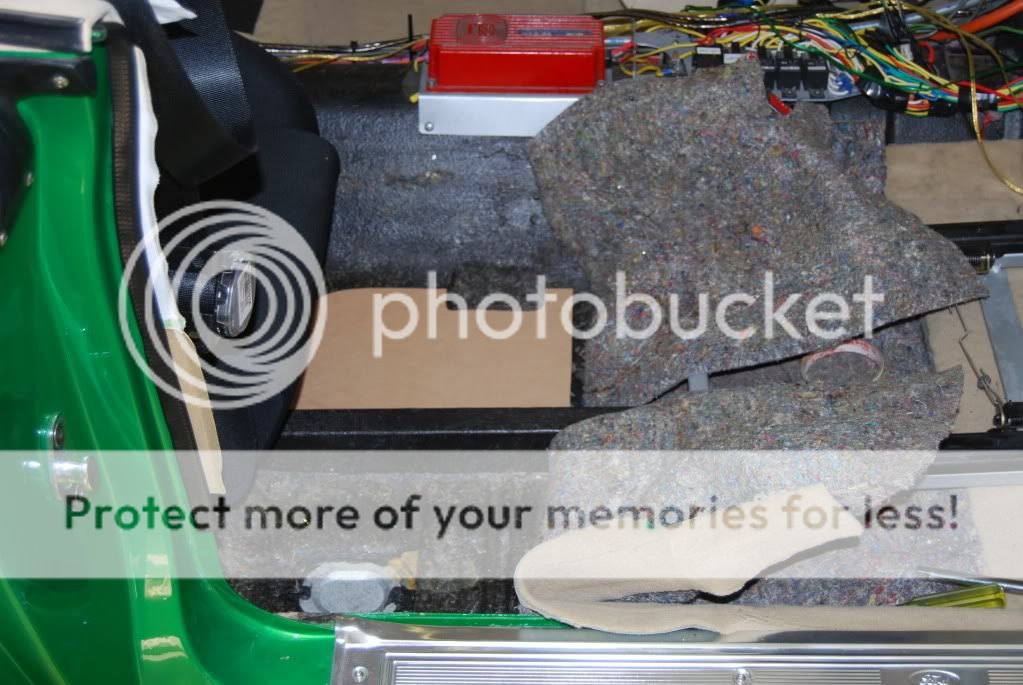 Before Carpets when down, the underlay was pulled up and flat boards installed to flatten out the floor irregularities. 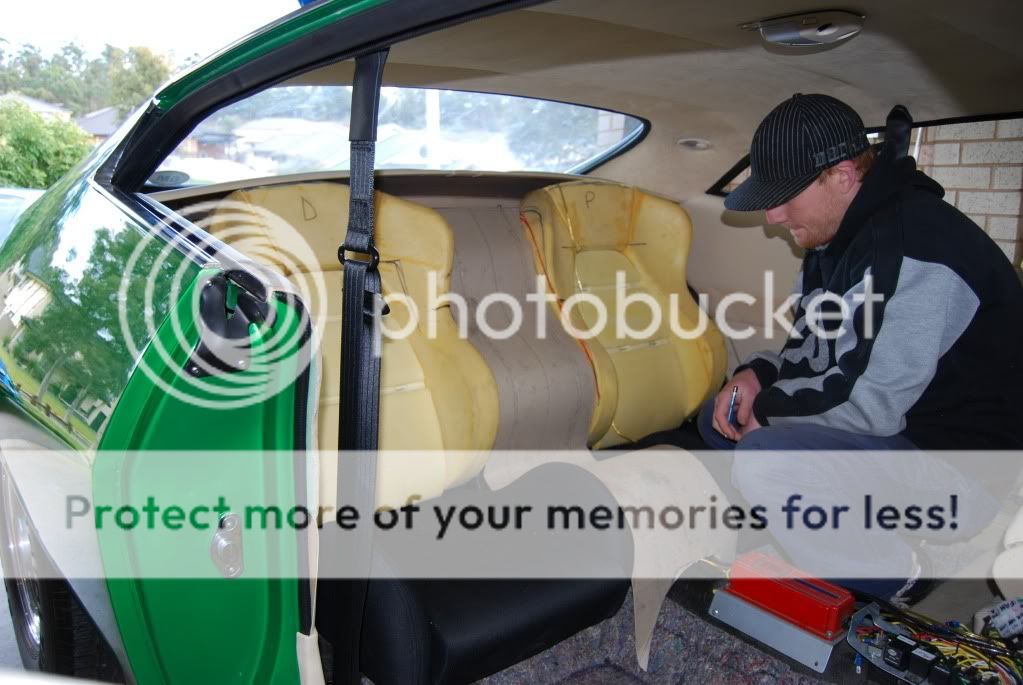 Simon from Elite Custom Interiors working on the center fill panel.  This is the bare frame of the side fill panels before laminating with thick cardboard layers 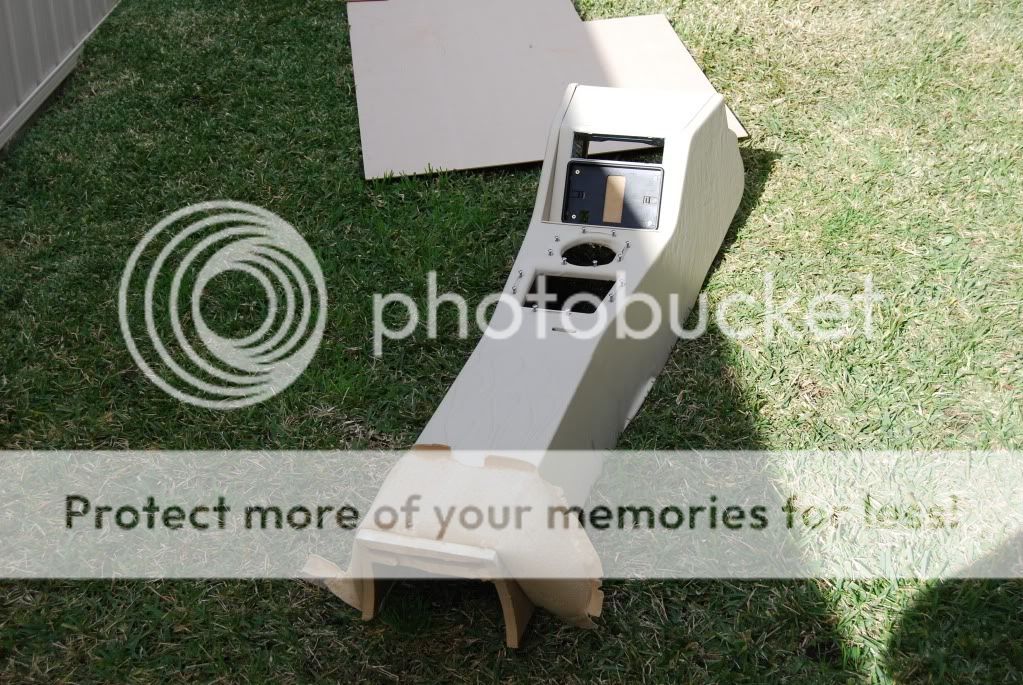 The unfortunate result of running out of room, center console had to be cut up to give good gaps around new parts. = more time and cost.  Small details count, silver backing behind the warning LED's is engrave with ID for each light. Hi beam, ALT and new Brake fail light. You will also notice the Harnesses are gone and enertia reel seat belts are now fitted. So the guys from Elite Custom Interiors will be busy tommorow, sewing up seats and bits and pieces, then hopefully Friday for the install. Wish me luck 
__________________
Proud member of the Clevo Mafia Limetime Green '74 XB Coupe- Classic not Plastic. Blueprint '02 Pursuit 250- Plastic not Classic (yet) Venom '01 AUII Rebel- RIP. Gone to a better place. Winter White '12 FG GT 335 R-Spec - something the wife thrashes daily '05 CRF450X- For getting dirty in the, um, dirt.
|
||
|
|
|
|
22-07-2010, 06:31 PM
|
#21 | ||
|
'69 XW
Join Date: Dec 2007
Location: Bris Vegas
Posts: 726
|
OMG! I love it- looks awesome. The attention to detail is great the dash looks really good and blends the original style with aftermarket look well: particularly the air controls. A very plush ride, best of luck with the suede arriving on time.
|
||
|
|
|
|
22-07-2010, 08:44 PM
|
#22 | ||
|
the money box
Join Date: Apr 2008
Location: blacktown
Posts: 417
|
hey gaz just in case i havn't told you before f#$k it's nice
__________________
proud member of the CLEVO MAFIA |
||
|
|
|
|
24-07-2010, 10:11 AM
|
#23 | ||
|
injection is nice, but...
Join Date: Jul 2007
Location: Camden, N.S.W
Posts: 1,070
|
photos from last nite.
The boys finished up about 10.00 last night and i still have a far amount of stuff to do. here are some photos from yesterday. 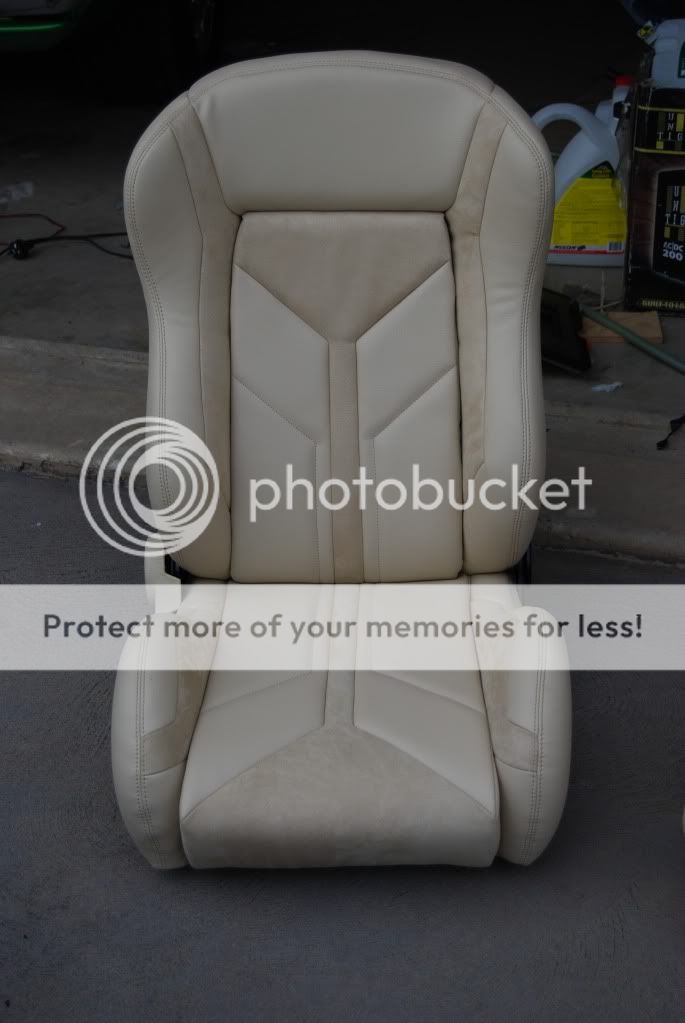 Rear seat trimmed to match fronts 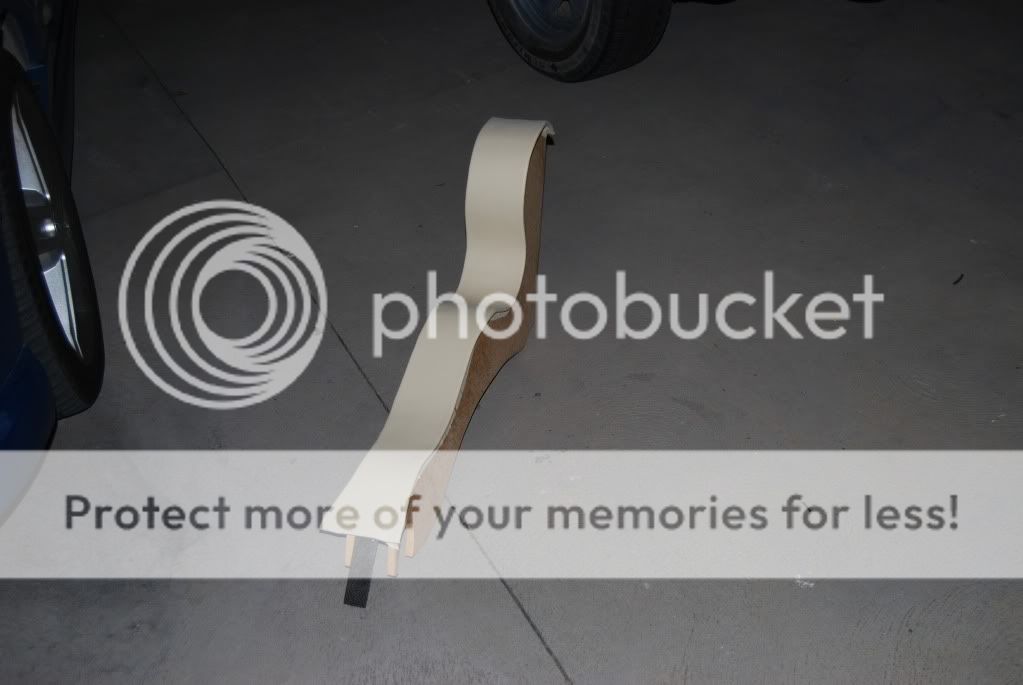 Fill panel for the sides  "The man" checking out his new seats 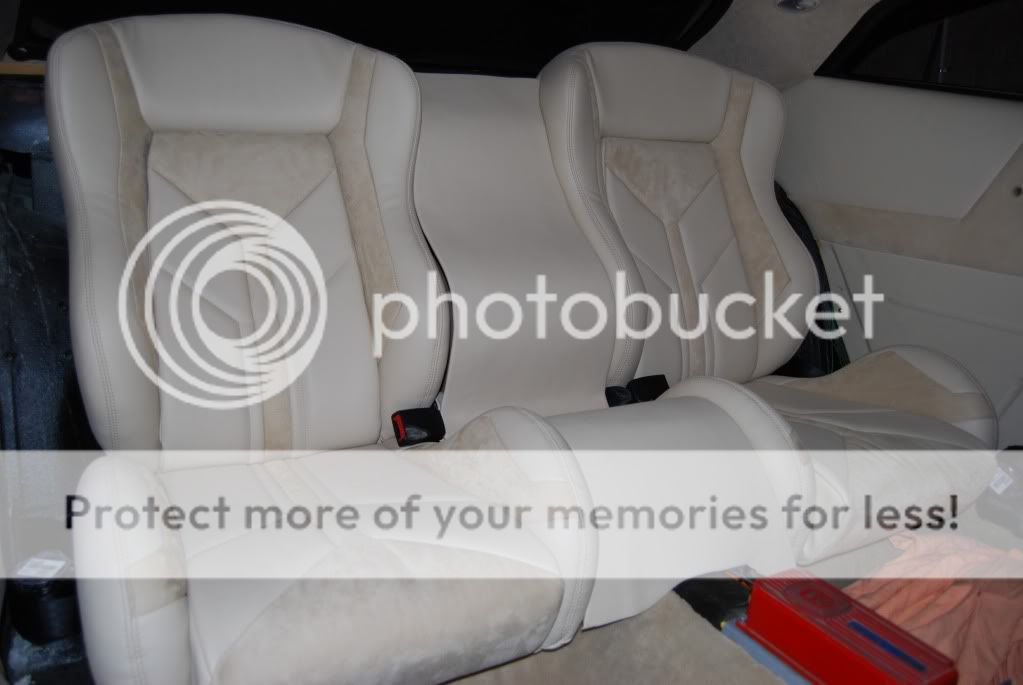 Seats installed 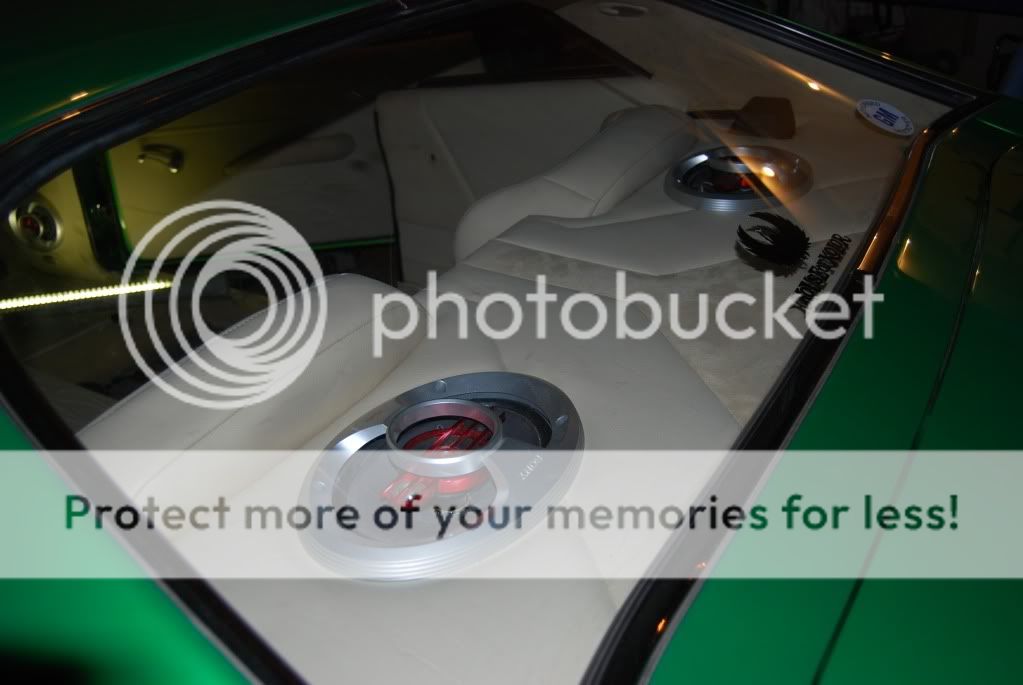 Parcel tray, i hate speakers on the parcel tray but there is nowhere else they can go. 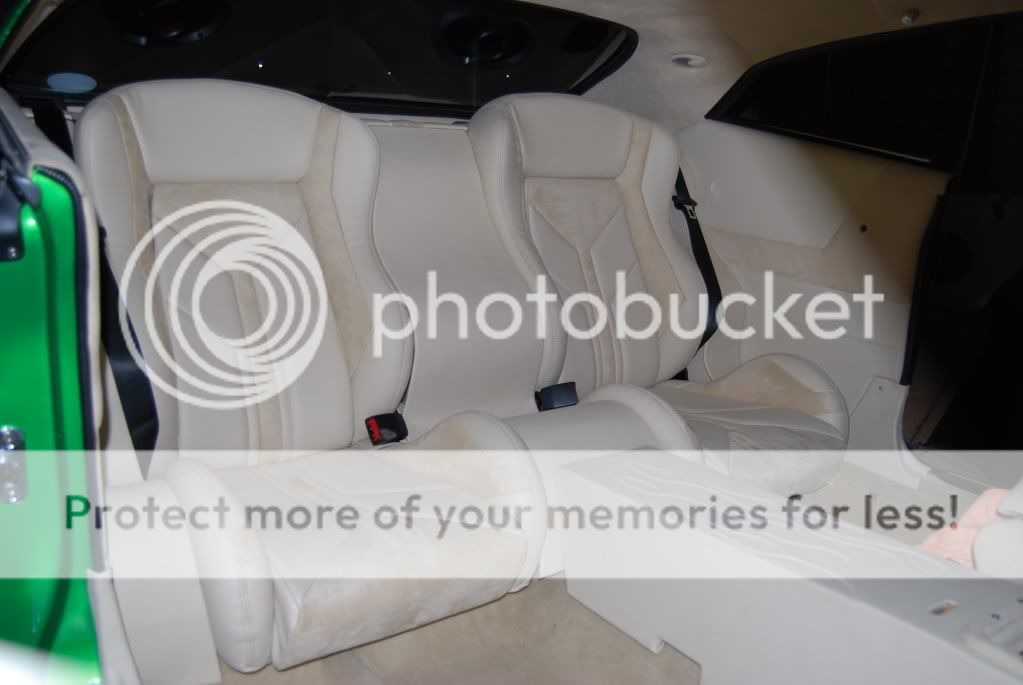 All done, with console trimmed to match
__________________
Proud member of the Clevo Mafia Limetime Green '74 XB Coupe- Classic not Plastic. Blueprint '02 Pursuit 250- Plastic not Classic (yet) Venom '01 AUII Rebel- RIP. Gone to a better place. Winter White '12 FG GT 335 R-Spec - something the wife thrashes daily '05 CRF450X- For getting dirty in the, um, dirt.
|
||
|
|
|
|
24-07-2010, 01:53 PM
|
#24 | ||
|
'69 XW
Join Date: Dec 2007
Location: Bris Vegas
Posts: 726
|
That looks awesome. Great pattern for the seats with the 2 textures and tied in well with the parcel tray. The little man looks very excited about his new seats. Well done...
|
||
|
|
|
|
24-07-2010, 02:11 PM
|
#25 | ||
|
BLOWN 383 CHEV OWNER
Join Date: Jan 2006
Location: SE Qld.
Posts: 4,398
|
Trim looks fantastic. Very nice style you have choosen. Colours look great too. Love the idea of buckets in the rear with full length console. Speakers are always an issue of where they go but what you have done looks neat and they are needed.
|
||
|
|
|
|
24-07-2010, 05:38 PM
|
#26 | ||
|
FF.Com.Au Hardcore
Join Date: May 2005
Location: Canberra
Posts: 954
|
HELL YEAH! Looks sweet as so far!
__________________
Old car 1973 Vivid Blue Pearl XB Coupe Engine Build up and progress thread New Car 2008 FG F6 Ute |
||
|
|
|
|
24-07-2010, 08:14 PM
|
#27 | ||
|
injection is nice, but...
Join Date: Jul 2007
Location: Camden, N.S.W
Posts: 1,070
|
Thanks for the comments fella's.
Ive been flat out today, started by reinstalling the console again, this time with wires and stereo installed, installed drivers seats and carpet. Fired up the car and all was good...... for a minute. Found i had zero fuel pressure. Lots of checking and finally found a broken wire under the center console, must have tore out of the connector some time in the last 4 months or so. So seats and carpet back in ( the seat and carpet acually hold the console in so i doesnt move) and away it went Picked up a new car trailer today too. Came home from that and loaded the coupe on it for the first time. Perfect fit. the car is now at my brothers ready for tomorrows AFD Sydney. See you there. Once the bank balance recovers, rego time! Im thinking September or October.
__________________
Proud member of the Clevo Mafia Limetime Green '74 XB Coupe- Classic not Plastic. Blueprint '02 Pursuit 250- Plastic not Classic (yet) Venom '01 AUII Rebel- RIP. Gone to a better place. Winter White '12 FG GT 335 R-Spec - something the wife thrashes daily '05 CRF450X- For getting dirty in the, um, dirt.
|
||
|
|
|
|
25-07-2010, 09:48 PM
|
#28 | ||
|
74xbkoop

Join Date: Mar 2008
Posts: 204
|
Luv the seats. Job well done!! Looks great.
|
||
|
|
|
|
04-10-2010, 08:05 PM
|
#29 | ||
|
injection is nice, but...
Join Date: Jul 2007
Location: Camden, N.S.W
Posts: 1,070
|
Hey people, a quick text update (no photos!)
Much has happened since the last post. i have finish off some trim details, such as enertia reel covers for the front seats and also made a repair to the drivers seat, the cable to allow the seat to tilt detached and locked the seat. took the back off and headed over to Elite custom trimming for them to help remove the trim to get to the cable. easy done, though i have a thought it my come back again, we'll see. Also modified a hornet scoop to clear the carbies and 'cleaners. sliced a medium size one horizonally and added about 3/4" to the height. This was to be painted this weekend but work and the rain stopped that. The biggest headache has been the front shocks. i had added an extra mount to the control arm to raise the car for rego. Last year going to Echuca, i dropped the car back to the lower mounts for a better look, without checking clearances. Anyway i recently went to move the shocks back up for rego and found oil on them. Closer inspection showed the new mounts have touched the shocks and bent them, allowing oil to escape.... Damb it!! So $780 later i have some new QA-1 shocks in the front and the added brackets removed. I have also been making a front sway bar. 28mm chrome-moly bar and some billet alloy arms. Still need to complete this, but its not required for rego anyways. My enginner has informed me that i will now need to complete a drive-by noise test for NSW rego. He doubts the car will pass with the 6/71 on it. So to combat the "induction noise" i have machined small grooves in the blower pulleys to allow the air thats compressed as the belt wraps around them escape. if this fails possibly new 8mm pitch belt system may work or even worse miltiple V belts. We'll see.... Oh yeah, got me some new front tyres too, super happy. 245/50/15. dunlop SP8000. imported from the USA. the front now looks much tuffer as the previous 225/50/15's made the car look under tyred at the front and a little low profiled compared to the 295/50/15's on the back. WIN!!! Oh yeah, the over flow tube for the radiator had come off the filler neck. ive taken it out and had a radiator dude fix it up. he took great care in not burning too much paint for me as well, except he scratched the crap out of the opposite end but resting it on a concrete floor, whilst doing the repair!  Once this and the scoop is painted ill book in for a blue slip and start the fight of all fights, full street rego!
__________________
Proud member of the Clevo Mafia Limetime Green '74 XB Coupe- Classic not Plastic. Blueprint '02 Pursuit 250- Plastic not Classic (yet) Venom '01 AUII Rebel- RIP. Gone to a better place. Winter White '12 FG GT 335 R-Spec - something the wife thrashes daily '05 CRF450X- For getting dirty in the, um, dirt.
|
||
|
|
|
|
04-10-2010, 08:40 PM
|
#30 | ||
|
74xbkoop
Join Date: Mar 2008
Posts: 204
|
Good luck with the Nazi NSW rego. Looking foward to seeing more photos when you get around to it.
|
||
|
|
|


 Hybrid Mode