
|
|

|
|
|
 18-07-2009, 04:40 PM
|
#1 | ||
|
Starter Motor
Join Date: Jun 2009
Posts: 24
|
hey guys
anyone managed to get an 3.5mm cable from the aux input in the glovebox (LT) to somewhere near the 12v behind the dash? wanna get one of these http://au.kensington.com/Products/Pr...S=0&P=15007681 for the iphone, only problem is getting the cable all the way to the glovebox. i have seen someone insert a female 3.5mm in one of the blank silver fascia things where the esp and rear defrost are, its somewhere on the net but cant find it anymore :( |
||

|

|
|
19-07-2009, 11:33 AM
|
#2 | ||
|
Focus & Territory TDCi
Join Date: Jun 2008
Posts: 251
|
I fed the wire through the glove box and up and into where the cup holders are on the center console.. took about 10minutes to do..
would love to see the write up as well on putting it where the rear defrost button is. |
||
|
|
|
|
19-07-2009, 11:35 AM
|
#3 | ||
|
EuroFordClub

Join Date: Oct 2007
Location: SE Melbourne
Posts: 727
|
I did that in my car. Didn't install a female input onto one of the blanks, but routed the aux cable through the dash to the centre console, then drilled a hole through the rubber insert and the dash right next to the 12V accessory power. Then just pulled the aux cable through the hole and left it lying in the little dish thingy there. Pretty easy to do. Gotta take the glovebox out though. And just a warning. If you did want to install a female socket into a blank next to the demister, that's a of a job, because you have to take the entire centre console apart.
__________________
'08 Black Ford Focus LT CL Hatch
Far from stock... --- SOLD  : : Now riding a 2009 Kawasaki Ninja 250R  : : |
||
|
|
|
|
19-07-2009, 03:53 PM
|
#4 | ||
|
Starter Motor
Join Date: Jun 2009
Posts: 24
|
maybe this is what i saw before, for the older focus but same idea...
http://web.mac.com/zifnab/Visteon_60...n_a_C-Max.html |
||
|
|
|
|
21-07-2009, 11:02 AM
|
#5 | ||
|
FF.Com.Au Hardcore

Join Date: Jun 2009
Location: Adelaide
Posts: 1,023
|
Does anyone have any pics of the dash (esp. centre console) being taken a part?
One of those things.... you usually break a few tabs the first time you do it yourself, only to be told "no, you remove this part first, which gives access to that screw, which then gives access to......" Another good sticky idea, yeah?
__________________
XG Falcon Ute, XE Fairmont Ghia & BA Mk II Falcon SR |
||
|
|
|
|
29-07-2009, 04:48 PM
|
#6 | ||
|
Starter Motor
Join Date: Jun 2009
Posts: 24
|
http://www.ffoc.co.uk/modules.php?na...topic&t=216309
found another tutorial may need to sign up to ffoc.co.uk to view... |
||
|
|
|
|
04-10-2009, 06:41 PM
|
#7 | ||
|
Regular Member

Join Date: Oct 2008
Posts: 198
|
I did a similar thing so that I could run my MP3 player from the centre console, just fed an audio jack cable from the auxiliary port and ran it through the light cutout in the glove box (top right where the light shines out of) then ran the cable down to the centre console, popped out the blanking plugs and then gently lifted the fascia of the centre console out just enough to pop out the cable, then simply zip-tie the rest of the cabling away behind the centre console, nice cheap and effective, however only problem I have with it is the feedback when I have the MP3 on charge, it's horrendous, anyone know how to rectify this???
__________________
I drive my American Owned, German Inspired, South African Built, Australian Bought, European Styled, English Powered car. I might have missed something somewhere... 08' LT Ford Focus CL Check out 819FLY!! |
||
|
|
|
|
04-10-2009, 08:48 PM
|
#8 | ||
|
You can call me Chris

Join Date: Sep 2009
Location: Sydney
Posts: 712
|
Watch me start a new thread tomorrow;
"So I have broken my head unit and front console" Going to give it a go tomorrow! |
||
|
|
|
|
05-10-2009, 10:02 PM
|
#9 | ||
|
You can call me Chris
Join Date: Sep 2009
Location: Sydney
Posts: 712
|
Woohoo, so I dont need to start a thread about me destroying my car!
I cheated slighty by not going direct to the back of the CD player, but by having a tidy hidden look that still utilises the glove box AUX in. I thought Id do a quick write up on an easy way to get yourself sorted! All you need is; a)patience b)Know where the missers has hidden your soldering iron c)a T25 screw head (the star shaped one that holds the glove box together) d)2 cable ties e)a local Jaycar to make life easy & last but certainly not least, a 3.5mm stereo lead, the 90 degree angled plug http://www.jaycar.com.au/productView...m&form=KEYWORD and this little baby http://www.jaycar.com.au/productView...m&form=KEYWORD a 3.5mm socket so it looks all professional and tidy! First thing first, you need to cut one end of the 3.5mm stereo plugs off, and solder it onto the socket. The socket has 3 plugs, one for neative, one for positive and the top one for earth. This is handy is you have done some sort of electric work before so as you know how to strip the cables and how to create the earth. Once done, a good covering in electrical tape tidies this up. Secondly, once you get the cover off (a spare next to the demister) Its a bit fiddly to get off without scratching, but a blade screwdriver wrapped in a cloth should do the trick. This was probably the most time consuming, as I was worried I would break it, but once you get one corner off, it comes off fairly easy. **PLEASE PAY ATTENTION AND DONT DO WHAT I DID!!!**** Once off, drill a 6mm hole in the middle, what I done was manage to get it off centre by about 2mm which created a major nightmare and an extra 20 minutes than what was needed. Once the hole is drilled, the newly created cable and socket you have created should slot right in, there is then a collar that screws in from the outside to keep it secure. This is part I done! With the cap still off next to the demister, feed the cable through all the way until you can feel it through the passenger footwell. It will come through all the way to the end of the plastic, just before all the fuses. Once it is through, push the cover back on and you have Part II complete. The last part is where you need the T25 screw head to take off all 7 glove box screws. Once off, you can then feed the cable up from the footwell, over the top of the glovebox, and drop the cable in the opening for the light. Push the glove box back in, put all the screws in, and you are done! You might need a couple of cable ties to secure the cable at the top of the passenger footwell on the fuse cover. You then end up having a nice tidy look; 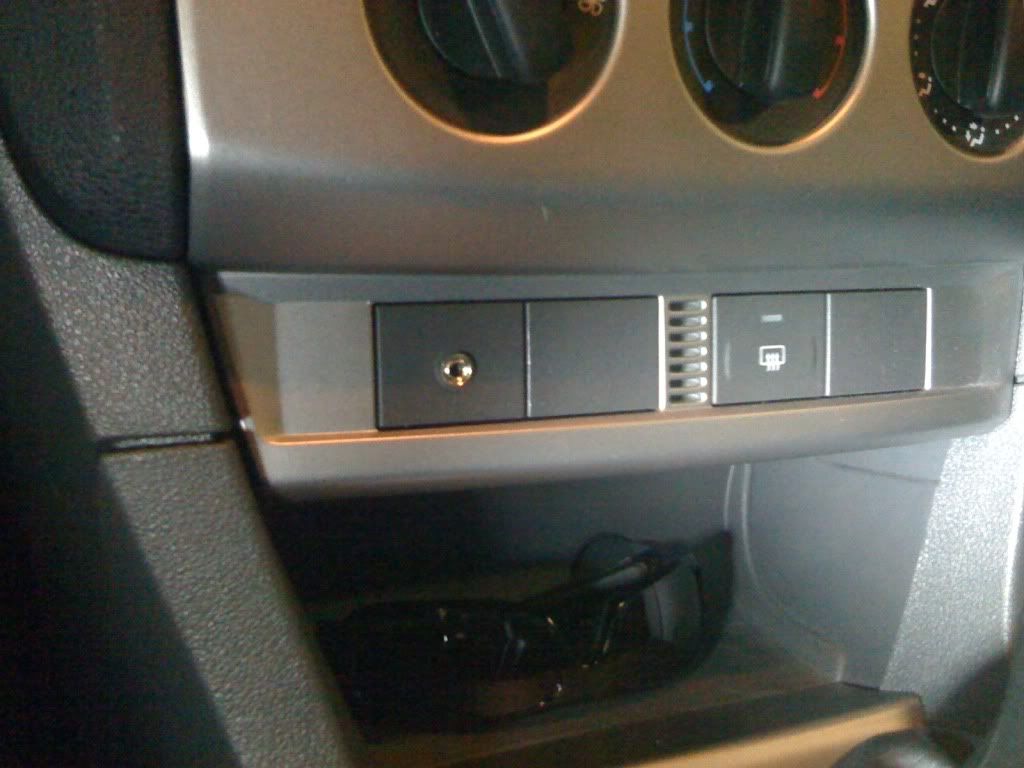 And if you leave just a short amount of cable, it will connect nicely into the AUX in socket in the glove box 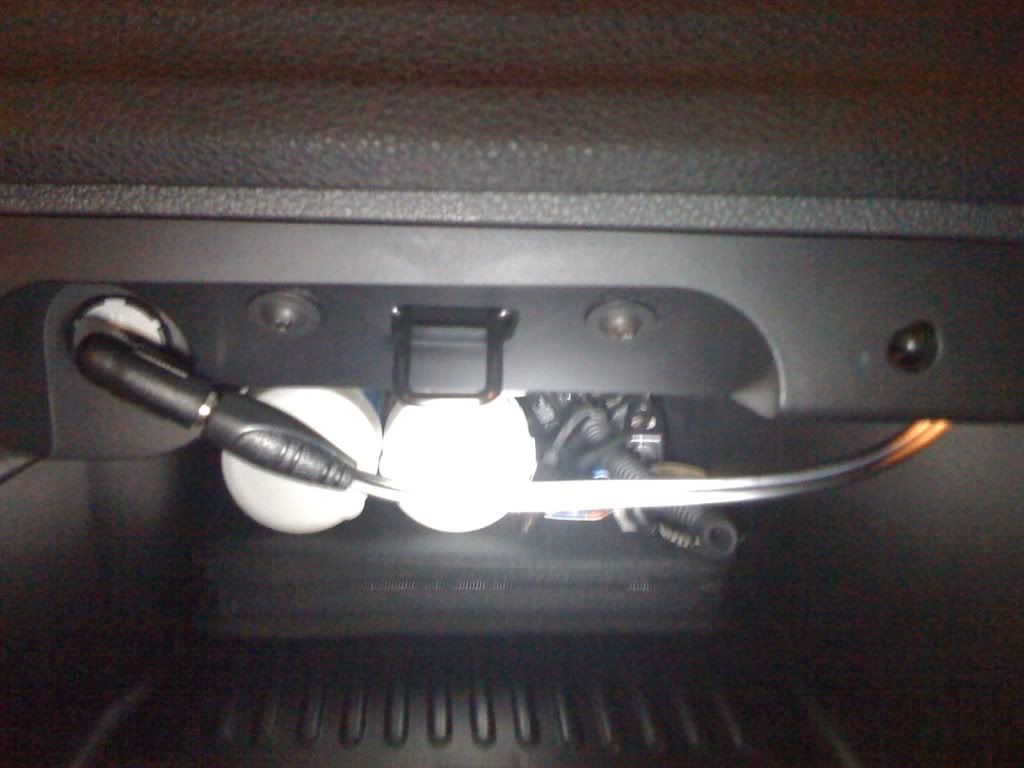 I hope this helps those of you, like me, who dont want to mess around with taking the CD player out. The total time taken on this was about 45 mins. |
||
|
|
|
|
05-10-2009, 10:16 PM
|
#10 | ||
|
Eat my Brake Dust

Join Date: Apr 2008
Location: In the back with Miss Alba
Posts: 985
|
That is a very nice, clean way of doing things. looks factory. I'm impressed.
__________________
Small Ford Sunday 2009 - Best Modified Car presented by the EuroFord Club Small Ford Sunday 2009 - Best Focus (Non-XR5) presented by the RS Owners Club of Victoria Sydney All Ford Day 2009 - Best in Club presented by The Combined Ford Clubs of NSW Small Ford Sunday 2010 - Best Modified Car presented by the EuroFord Club  If I'm going to Hell, I'm going in a Ford If I'm going to Hell, I'm going in a Ford |
||
|
|
|
|
05-10-2009, 10:36 PM
|
#11 | ||
|
You can call me Chris
Join Date: Sep 2009
Location: Sydney
Posts: 712
|
Haha, your impressed? Im impressed I have nothing broken/burnt down! haha
Thanks though  Yeah I just wanted a diff way to do it htat I read on the UK forum, I was just too worried about pulling out the head-unit and attaching wires direct. |
||
|
|
|
|
05-10-2009, 11:38 PM
|
#12 | |||
|
Regular Member
Join Date: Oct 2008
Posts: 198
|
Quote:
__________________
I drive my American Owned, German Inspired, South African Built, Australian Bought, European Styled, English Powered car. I might have missed something somewhere... 08' LT Ford Focus CL Check out 819FLY!! |
|||
|
|
|


 Linear Mode
